Table of Contents
Unirgy Installer
Introduction
Installation
1. Download ionCube loader from the official website. Install it as described in the README.txt attached to the archive you've downloaded.
2. Login to Magento backend
3. Go to System → Tools → Compilation.
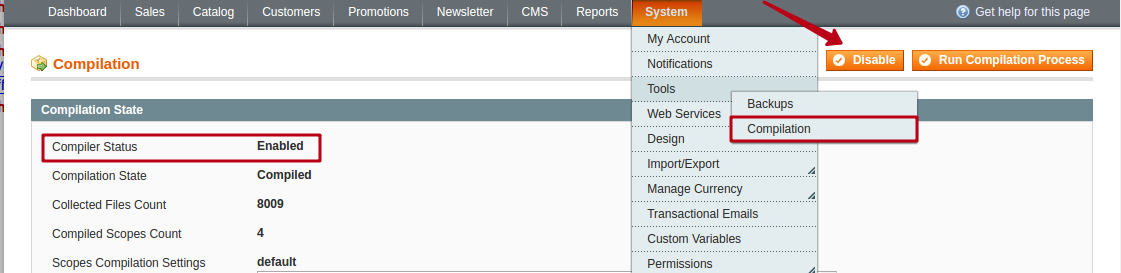
If Compiler Status is Enabled, disable the compilation by clicking the button Disable
4. Download the extension here
5. Connect to your website with FTP/sFTP/SSH and upload the app folder to the root folder of your Magento installation.
Use the “Merge” upload mode. Do not replace the whole folders, but merge them. This way your FTP/SFTP client will only add new files. This mode is used by default by most file transfer applications
6. In your backend go to System → Cache Management
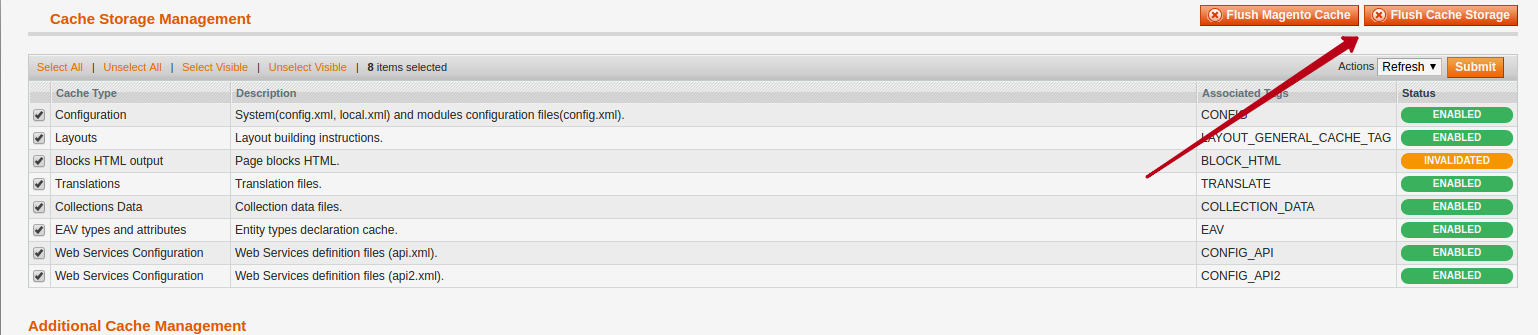
Click Flush Cache Storage button.
7. If you need to enable compilation, you can do it at System → Tools → Compilation. Click the Run Compilation Process button.
8. Log out from the backend and log in again.
Set up
Automatically
1. Go to System → Tools → Unirgy Installer
2. To add the new license go to the Add Licenses tab.
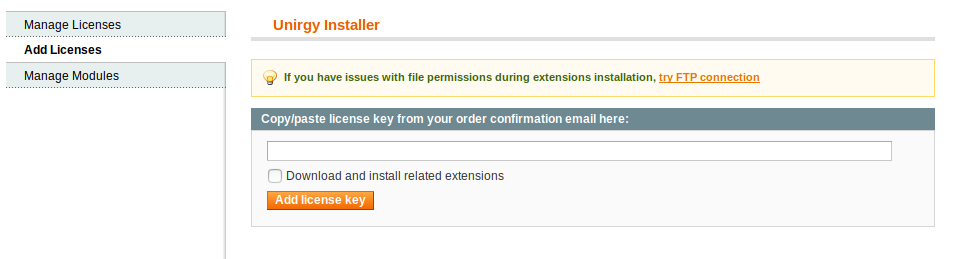
You need to type (or copy/paste) the license key in the text field. If you wish the corresponding extensions to be downloaded and installed, you can select the Download and install related extensions checkbox.
To perform the installation, Unirgy Installer uses PHP Zip. If it is not enabled on your server, you can use the manual installation of the extension.
Manual Installation
1. Go to the Manage Modules tab.

2. Click the Hover/Click button of the extension that you wish to install.
3. The module will be downloaded on your local device.
4. Follow the same procedures as provided for the installation of the Unirgy Installer
5. After wiping the caches, logout and login to the Magento backend. You should be able to view the new extensions on your website
If you face the 404 page on the backend instead of the Module configuration after the installation of the extension, try to perform the logout/login operation
Manage Licenses
Go to System → Tools → Unirgy Installer → Manage Licenses
Here is the grid with all the licenses that you've purchased

1. Send Server Info This allows to send the server info (such as IP, MAC address, etc) to Unirgy server. May be useful in case the client doesn't have this information at hand.
2. Refresh Licenses Button applies to all licences
3. Status Can be either Active, Inactive or Expired.
4. License Key The license key added via Add License tab will be shown here.
5. Products Covered. The extension that is assigned to this license key. In case several extensions cover the same license, all of them will be on this list.
6. Dev Servers Localhost is always included in the license, in addition, you can specify a single development domain.
7. Live Servers 1 This field is for the domain name of the live server
8. Live Servers 2 This field is for the IP/MAC address
9. License Expires The date when trial/1 week licenses are terminated.
10.Upgrade Expires Date when your license becomes expired.
Manage Modules
To find out which Unirgy Modules have been installed go to System > Tools > Unirgy Installer.
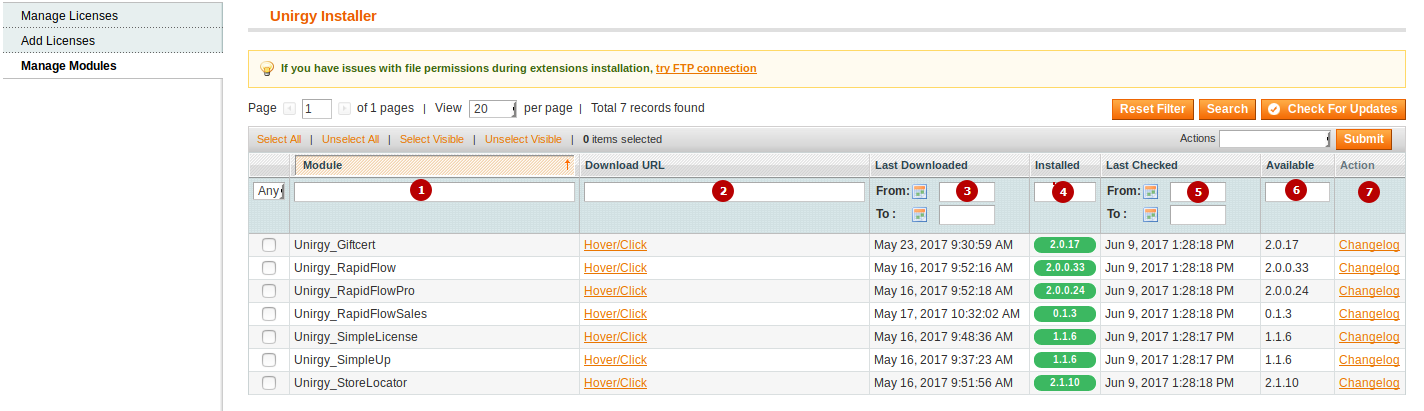
1. Module. The name of the extension.
2. Download URL. Necessary for the manual installation. The link to download the latest version of the extension available to the client.
3. Last downloaded. The date when the latest version of the extension was installed on this server.
4. Installed. The version of the installed extension. If background color of this cell is Red then module has an update available. If color is Green then module has the latest version and if the color is Orange, the version installed is not recognized (it happens when you have customized extension.)
5. Last checked. Date when the client's licenses were checked for the last time.
6. Available The latest version of the extension that is available right now. Bear in mind that in order to download this particular version, the client needs to renew their license in case it is expired.
7. Changelog If the client is not using the latest version of the extension, they can check the changelog to look for the new features.
Troubleshooting
Compilation Not Disabled
If you did not disable compilation and the website isn't working, open config.php file located at root_folder/includes and comment out strings 28-29
#define('COMPILER_INCLUDE_PATH', dirname(__FILE__).DIRECTORY_SEPARATOR.'src');
#define('COMPILER_COLLECT_PATH', dirname(__FILE__).DIRECTORY_SEPARATOR.'stat');
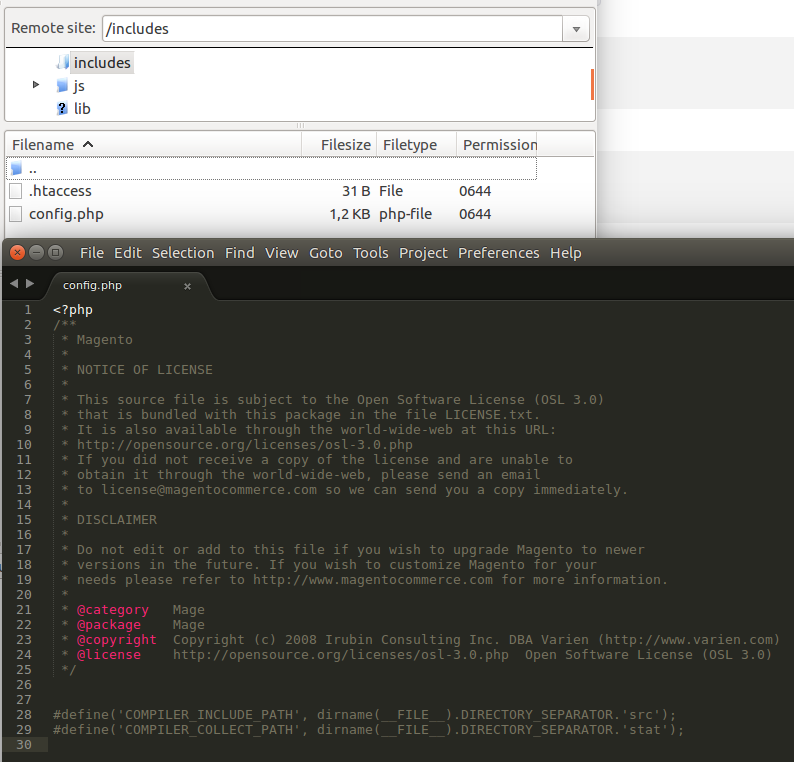
Save the changes. This operation should disable the compilation.
After compilation is disabled, your website should be recovered.
To enable compilation, you can do it at System → Tools → Compilation. Click the Run Compilation Process button.
Write Permissions Issues
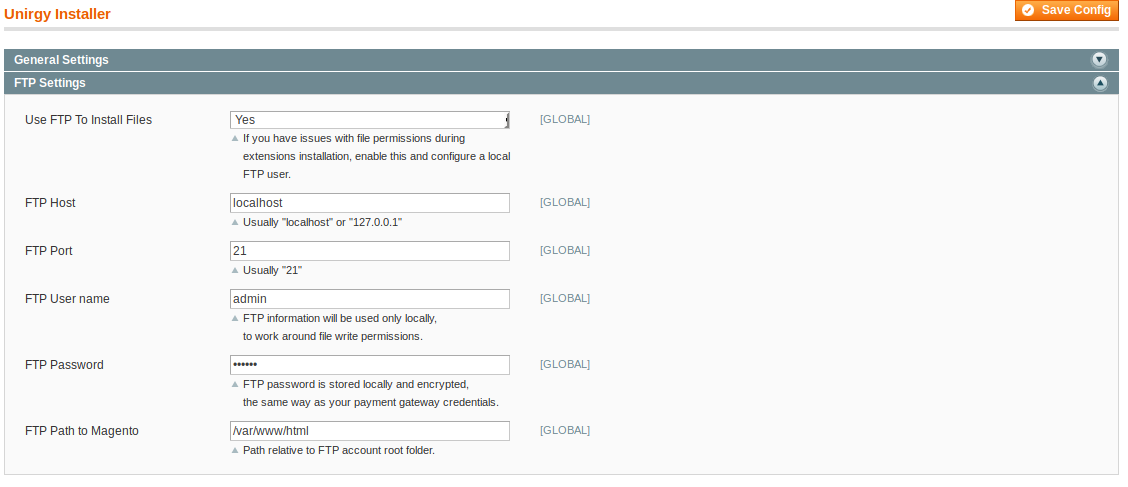
In case you observe the issues with the write permissions that disallow you from the extension installation, you can try to specify the alternative user with write permissions in System → Configuration → Advanced → Unirgy Installer → FTP Settings
Base table or View not found
You may observe the SQL error SQLSTATE[42S02]: Base table or view not found after the extension installation.

These symptoms are most often due to Magento cache being enabled during the upload process. Unfortunately, this results in setup scripts not being run. To fix this setup, scripts must be triggered. This can be done only by reinitializing the installation process with caches disabled.
1. Disable any Magento cache.
2. Login to your database.
3. Execute:
DELETE from `core_resources` WHERE code LIKE 'usimple%';
4. Flush and enable caches.
This operation should fix this issue.
